As the hype around AI technologies like chatbots, large language models (LLMs), and copilots started after the release of ChatGPT, many more use cases soon appeared.
I’m not talking about the most common ones like writing assistants, image generators, or chatbots trained on your data. I’m talking about more niche use cases like realistic talking avatars, video editors, or speech synthesis.
In this article, we’re going to explore one of those use cases – a transcriber app that you can use with podcasts or YouTube videos. It will be of great value if you’ve ever wanted to use the GPT-3 API or see an OpenAI Whisper demo in action.
For part 1 of this tutorial, we’ll go through everything we need to get set up and start the development of the app.
And then in part 2, we’ll upload our working code to the cloud and get a user interface working so that others can see the results and interact with the app.
Now, buckle up because we’ll get our hands dirty with some Python code building this.

Setting the stage
To build this, we’ll go through 3 acts.
- In the first one, we’ll see everything we need to get ready for the journey ahead.
- In the second one, we’ll build a prototype locally and find out what tools can assist us in the process.
- And in the final one, we’ll upload everything that we built to the cloud so that others can try it as well.
Sounds good?
Alright then, let’s go for it!

Act 1: The Setup (Whisper and GPT-3 API)
First things first, a rough overview of the process we will follow is extracting the information we want to transcribe and then feeding it to OpenAI’s Whisper.
From there, we’ll take the output and carry out some post-processing on it before displaying it in a front-end application for others to see and be able to interact with it.
This process would take a couple of extra steps if we did it manually. Fortunately, OpenAI made available API access for both Whisper and ChatGPT.
Here you’ll have to decide which path to take.
- Building this locally in your machine (assuming you have Python 3 installed) or,
- Building it online using a Google Colab notebook.
Choose your path first and then we’ll proceed.
Next, we’ll need an API key from OpenAI to access the GPT-3.5 Turbo model (which is basically the model that powers ChatGPT).
If you don’t know how to get one, follow these steps:
- Go to the OpenAI platform website and log in or sign up (depending on your case).
- Then, click on your profile icon in the top right to display the options and select “View API keys”.

- On that page, you’ll see an option that says “create new secret key” under the API keys section.
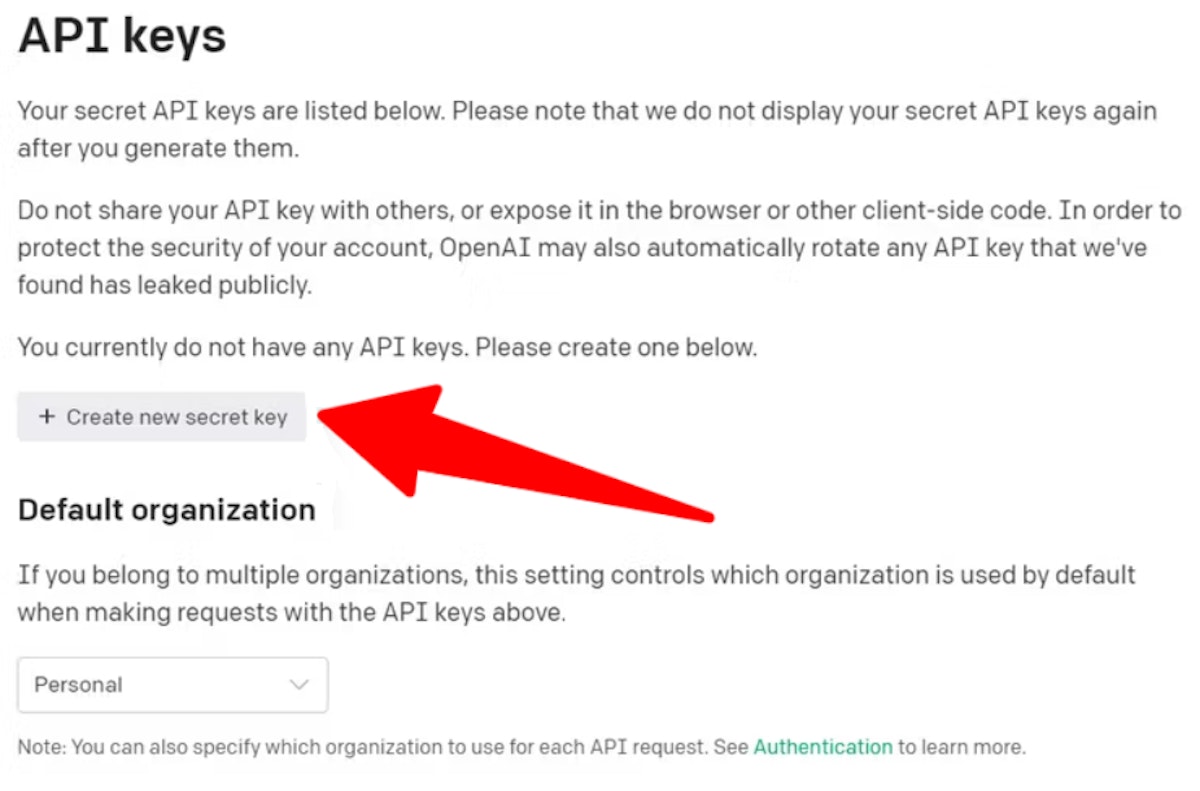
- It will display a popup where your secret key is displayed. Save it in a secure place because you won’t see it ever again.
Once you have that key, we’ll go for the next piece of the puzzle, Whisper.
You can download and install the latest version of Whisper on your machine by running the following command:
pip install -U openai-whisper
Alternatively, you can install the latest commit from Git with its dependencies using this command:
pip install git+https://github.com/openai/whisper.git
This gives you more control of what version you are installing (and it’s the command you’ll want to run if you’re trying this from a Colab notebook.)
Note: You will need to have ‘ffmpeg’ installed if you want to run Whisper from the command line.
With Whisper installed, all we need now are the actual files we want to transcribe. We can feed it several types of media files like ‘mp3’, ‘mp4’, ‘mpeg’, ‘wav’, and many more.
The only limitation here is the size of the files, it will take much more time with a 10-minute video than a 20-minute podcast.
Now, here’s the next fork in the road.

You’ll have to choose if you want to transcribe video or audio.
For the sake of simplicity in this example, we’ll go with using audio files from podcasts.
And here, the question that could be on your mind is “Where do I download podcast episodes from?”.
There are 2 ways that I know of.
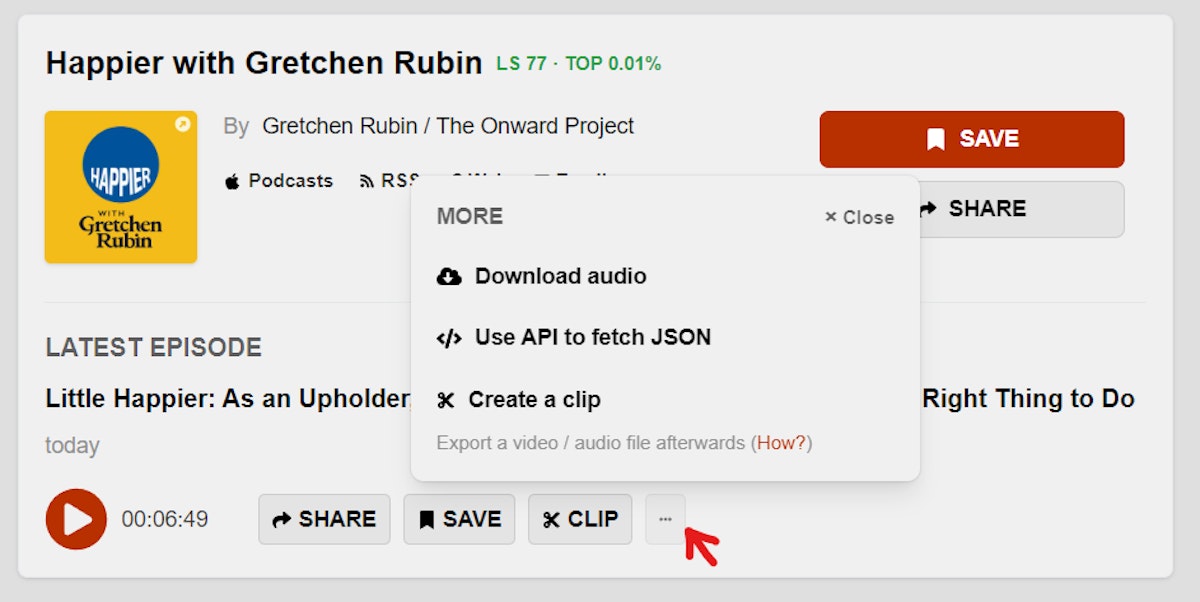
The 1st one is to use a site like ListenNotes, choose any podcast you like, and go to the individual episodes.
It’s worth noting that you’ll have to create an account to be able to access the individual episodes and their corresponding audio files.
From there, you’ll have to click on a button with 3 dots to open up a “more” tab and then you’ll see the option to download the audio.
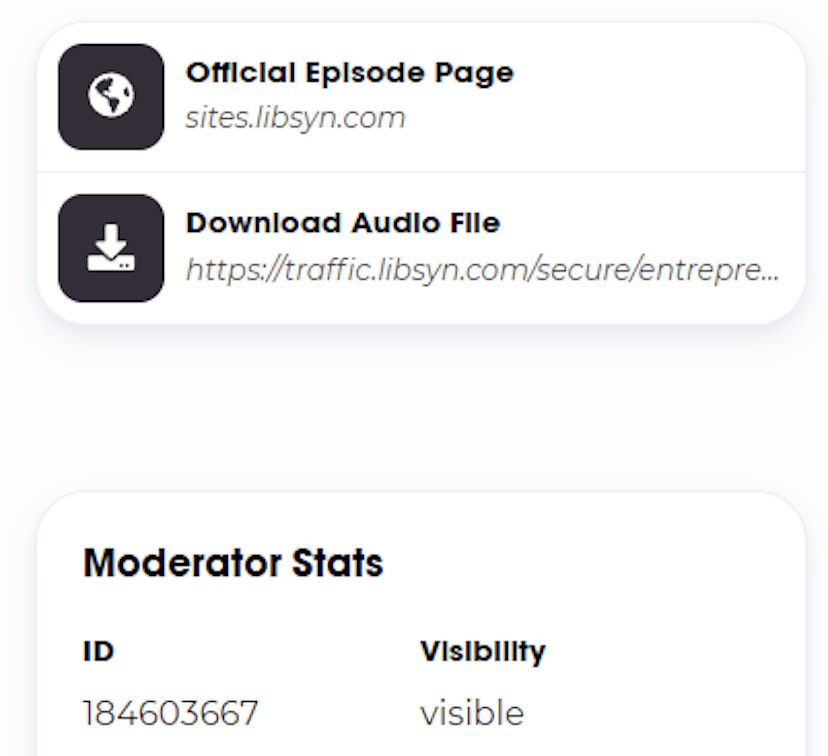
The 2nd option is to use Podchaser instead. You’ll follow a similar process of finding a podcast, going through the episode list, and choosing a particular one.
Once you get to the page of the individual episode, you’ll see a column on the right-hand side that has the play button and other options underneath.
If you scroll down, you’ll see info about the podcast, options to share on socials, and a small section with the option to download the audio file.
Choose whichever option you prefer and download a couple of episodes that have different lengths so you can test how the transcription process works.
My recommendation is that you choose episodes that are shorter than 30 minutes.
The reason for this is that if you choose a longer one, Whisper might take a long time to process it and you could run into timeout issues (Especially if you are using the Colab environment).
An episode of 20-30 minutes can take from 4 to 8 minutes to get transcribed.
The main bottleneck here is the duration of the transcription process before we get a result that we can use for further work.
Now that we have fulfilled all the requirements and the setup is completed.
It’s time for us to move on to the next part of the journey.
Act 2: The Development (OpenAI Whisper Demo)
We are getting into deeper programming territory.
We’ll use Whisper through Python since that’s more convenient. And we don’t need to do anything special for the transcription, just pass the audio file to the model and wait for the transcription, that’s it.
So let’s go through that process line by line.
import whisper

model = whisper.load_model("base")
Here we load the ‘base’ version of the Whisper model. There are several versions (or “sizes”) that OpenAI released and they vary on the number of parameters, resources they consume, and time it takes to perform the transcription.
Here’s a handy chart for reference.
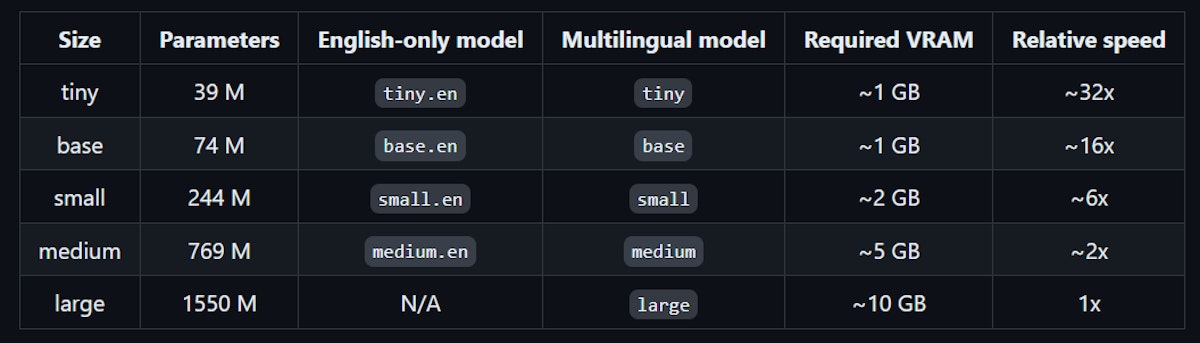
You can go ahead and try them all for size (pun intended) if you want.
Bear in mind that if you use a bigger model, you’ll need more resources for running it (like a GPU).
So, if you’re running this in Colab, you could use this command instead.
model = whisper.load_model('medium', device='cuda')
You pass in the parameter of the device you want this to be run on.
After you’ve chosen the size of the model, you can then pass in the audio file you want to transcribe, like this:
result = model.transcribe(“path-to-where-the-file-is”)
Then you can print the contents to verify the transcription worked. (But you may want to only peek into the first 1000 characters or so, instead of printing out the entire thing.)
podcast_transcript = result[‘text’]
podcast_transcript[:1000]
If that turned out well, you now have the results of the transcription process saved to a variable. The one we will use for post-processing.
That’s easy enough. But let’s suppose that we want to have a way to know what was discussed in the podcast beyond what we would find in the episode description.
We can create a function that takes the whole transcript and gives us an “executive summary”. A summary that we can also share with busy people who don’t have the time to go through the entire thing and see if it’s worth their time or not.
Let’s go ahead and do that.
Any guesses for what we’ll use to make that summary?
Hint: We already have an API key for it.
Yep, you got it.
We’ll use the `get-3.5-turbo` model to create this summary by providing it with the transcript of the podcast.
We could do the calls directly to the API, but it’s much more convenient to use the OpenAI package for it (which is aptly named ‘openai’ 😆).
We will also need the tokenizer library from OpenAI to know the amount of tokens we’ll be sending to the model.
And we can install both of those by running…
pip install openai
pip install tiktoken
Now, we need to save the API key somewhere before we make the call to GPT-3.
You can save it as an environment variable and then have it ready to use in the code like this.
openai.api_key = os.environ["OPENAI"]
Or if you’re using the Colab environment, you can do something like this.
import openai
from getpass import getpass

openai.api_key = getpass("Enter your key here: ")
And then, when you run that command it’ll display an input cell where you can paste the key.
Now, you can confirm that the key works by listing the models currently available with this piece of code.
models = openai.Model.list()
for model in models['data]:
  print(model['root'])
With our key working correctly, we can go ahead and make the call to the GPT-3 API.
But there’s something important we have to take into account first. And that’s related to what I mentioned earlier about “tokens”.
Since the idea is to pass the podcast transcript to the AI model and get back a summary of it, we need to know how many “tokens” it’s capable of accepting.
The AI doesn’t count words or characters but instead uses tokens. That’s why the concept of “context window” exists.
If we exceed the length of the context window, our transcript can get truncated and we’ll get a summary from incomplete data. (Another reason for choosing a podcast episode that’s not too long.)
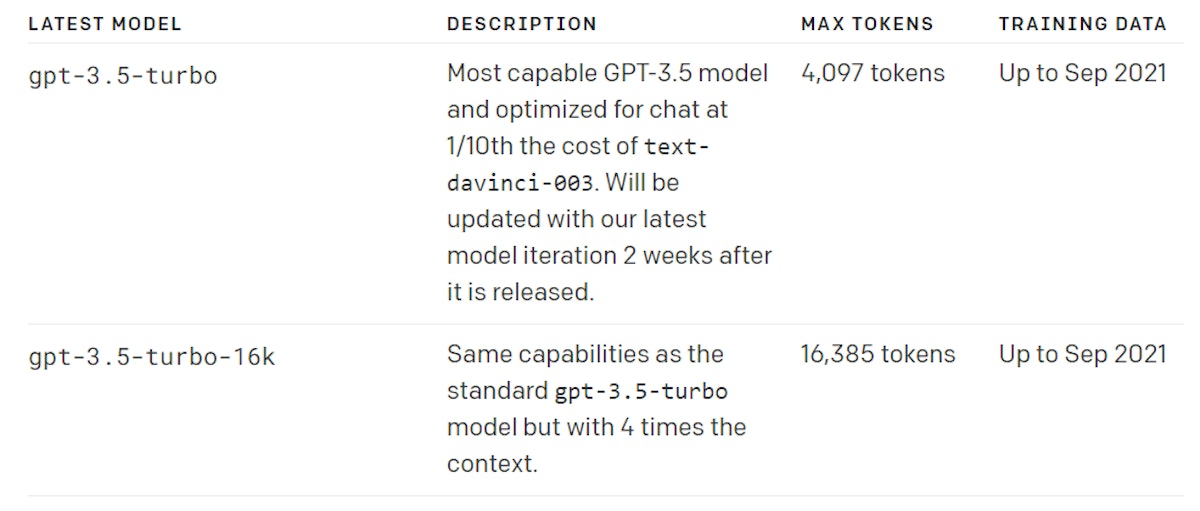
Fortunately, there are 2 versions of the GPT-3 model. The traditional one and another with an extended context window.
If you check the OpenAI docs, you can see the difference between those.
And that’s what the `tiktoken` library is for. It will help us to know how many tokens are in the transcript, that way we know what model to use for the summary.
We can make that calculation with the following code.
import tiktoken
enc = tiktoken.encoding_for_model(“gpt-3.5-turbo”)
print(“Number of tokens in the input ”, len(enc.encode(podcast_transcript)))
If the amount of tokens in the result is greater than 4,097, then we’ll have to use the ‘16k’ version of the model.
After knowing this, we can finally make the call to the API using the proper model for the situation.
First, let’s save the prompt we’ll send to the model in a variable. You can experiment with your own prompt, but here’s an example:
prompt = """
You are an expert marketer responsible for the growth of several popular podcasts. You are now tasked with summarizing an episode in a way that is concise and covers the main points of the episode for others to understand.

The transcript of the episode is provided below.
"""

request = prompt + podcast_transcript
Now, let’s make the call to the API using the following code.
chatOutput = openai.ChatCompletion.create(model="gpt-3.5-turbo-16k",
    messages=[{"role": "system", "content": "You are a helpful assistant."},
                        {"role": "user", "content": request}
                        ]
    )
And then let’s check the response from the API.
chatOutput.choices[0].messages.content
There you have it! A summary of the podcast episode based on the transcript that we generated using Whisper.
You can use this same process to extract the main highlights of the episode. Kind of like a way to provide the potential listener with a peek into the conversation.
The way to do this is very similar. The only part that changes is the prompt that the model will receive. Instead of asking for a summary, you can ask it to extract the most important points in a list format. The results depend on your creativity with the prompts.
Now that we know this works, we can put all the code into a function to run it locally.
So, let’s go ahead and create that function.
def transcribe_podcast(file_path):

    print("Starting podcast transcription")


    # Load the Whisper model

    import os

    import Whisper

    print("Loading the Whisper model")

    model = whisper.load_model("medium")

    print(model.device)


    # Do the transcription

    print("Starting the transcription")

    result = model.transcribe(file_path)


    # Return the transcribed text

    print("Transcription completed, returning results...")

    return result
You can call that function, sending it the path of an audio file and get a transcription in return.
Here’s an example of how you would do that.
output = transcribe_podcast(‘path_to_audio_file’)
And then peek into the contents of the transcript.
output[text][:1000]
Alright, so far so good.
Now that this works locally, it would be great to upload it to the cloud so that you could show it to others and impress friends & family with your l33t h4xx0r coding skills. 😆
But no really, it’s a good choice to deploy it to an online service so that others can try it.
And we’re going to do that in part 2. Making a cloud function that can accept requests and getting a quick frontend done to visualize the results of that function (like the summary & highlights of the podcast episodes).
To be continued…
We’ll leave it at that for now.
So far you have the app working locally and you can test it out with different lengths of episodes and see the average length of time that Whisper takes to make the transcription.
Thank you for reading this far.
And I hope to see you again for Part 2.
This article was originally published by Juan F. Gonzalez on Hackernoon.